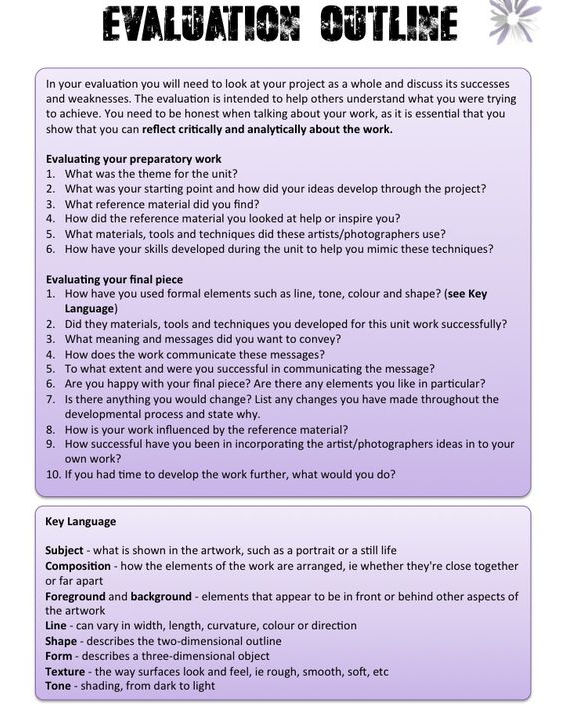
The Power of the Portrait:
Portraits, Self Portraits and Identity
Experiment with different layouts and designs.
Use black and white and colour, text, illustration, double exposure etc.


This is your chance to
Start learning new skills


Project aims and Objectives
Photography
Learn to use SLR cameras to produce creative imagery.
Photoshop
Understand how to use layers and selection tools in photoshop
Digital editing
How can we create an image from many other images that conveys a message?
Narrative
Narrative is about telling a story. How do we do this in an image?
HOW TO SAVE YOUR WORK
Click on the 9 dots next to Outlook and choose OneDrive, then go to 'My Files' and create a folder and call it Photography make it a different colour so you can find it easily. Drag all your work to this folder EVERY lesson.
You must save your work like this every lesson which will be any photographs you take or edits you work on.
Next, create a Powerpoint by clicking on the PowerPoint Icon, call this Year 10 Photography followed by your name, this will automatically save as you work on it. This is your digital sketchbook.


Time to EXPERIMENT!
LO: To Explore the importance of expression and emotion in Portraiture by using low key lighting in the studio.
Today you will explore the work of Photographer
Andy Gott.
You will do this by:
1. Creating an artist research page with images and information (we call this annotation)
2. You will then respond to his work by working in groups in the studio to capture portraits that show different expressions and emotions.
3. Each person should aim for at least 10 portraits each.
4. Present these in your online sketchbook with annotation about the process of how you achieved your images and which image is the most successful.


Use these sheets to help write about your artists and their work


Use these words to help you when you take your photographs in the studio
REMEMBER TO SAVE YOUR PHOTOGRAPHS IN YOUR ONEDRIVE EVERY LESSON
How to present my work in my digital sketchbook
Artist Research
My response - Photos and edits


Artist Research


My response - Photos and edits
LO: How to Use Photoshop to manipulate your images to create Double exposures.
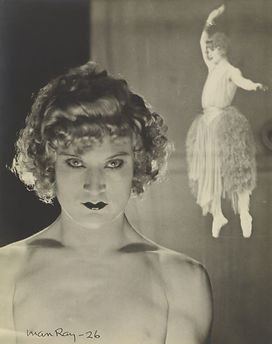
Today you will explore the work of Photographer
Man Ray and his double exposure technique
You will do this by:
1. Creating an artist research page with images and annotation
2. You will then respond to her work by editing the photos you took last lesson.
3. Download your images from your One Drive to your desktop.
4. Drag your 2 favourite images onto the PS icon at the bottom of your screens. This will automatically open Photoshop.
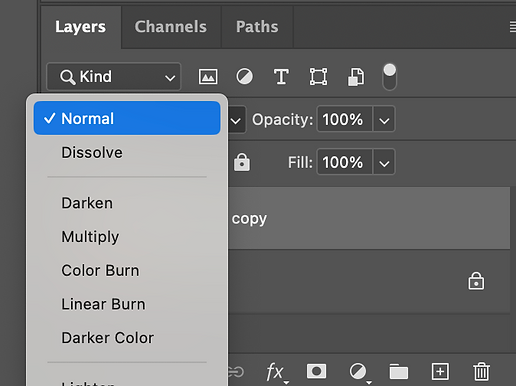
5. Drag them together on to one document with your move tool
6. Then go to your layers and blends palette, click on Normal and then choose different blends like Overlay and Screen to see how it effects the image.
7. Save at least 5 different versions to your desktop and present in your sketchbooks.


LO: How to Use Photoshop to manipulate your images to create an abstract 'Sliced' portrait.


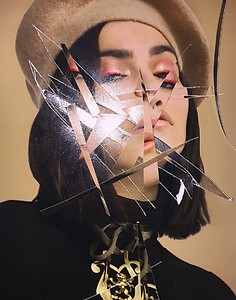
Follow the instructions
below to create your own.


8. To save the image go to file and 'save a copy', give it a name like 'sliced portrait' and save to 'desktop'. Then drag it into your photography folder in your OneDrive. Then drag this onto your next page of your
Today you will explore the work of Photographer
Rosanna Jones and her series called 'Sliced'
You will do this by:
1. Creating an artist research page with images and annotation
2. You will then respond to her work by editing the photos you took last lesson.
3. Drag your images from your work folder to your desktop.
4. Drag your favourite image onto the PS icon at the bottom of your screens. This will automatically open Photoshop.
5. Go to File - New and select 'Print' and A4
6. The tool you will be using today is called the Polygon lasso tool.
7. Select slices of your image to drag onto your New white background. Build them up to create an abstract sliced portrait.
REMEMBER TO ALWAYS SAVE YOUR PHOTOGRAPHS IN YOUR ONE DRIVE FOLDER, YOU MAY NEED TO CONTINUE EDITING THEM NEXT LESSON.


LO: How to Experiment with layers and filters in Photoshop to create a multi layered, fractured portrait.

Today you will explore the work of Photographer
Ella Manor
You will do this by:
1. Creating an artist research page with images and annotation about Manor's 'Creativity Heals' series.
2. You will then respond to her work by editing your studio portraits.
3. Drag your favourite portrait onto your desktop and drag it onto the PS icon, just like you did last lesson.
4. This time you will be using the rectangular marquee tool to select sections of your portrait.
5. Click on the Rectangular Marquee tool and drag an area of your portrait to select it. Then use the shortcut on your keyboard, hold the Cmd key then tap c then v. This will copy and paste the selection.
6. This creates a new layer which you can now change using 'filters and adjustments'


7. Present any edits you completed in your sketchbook with annotation about the process of how you achieved your images and which image is the most successful.
REMEMBER TO SAVE YOUR PHOTOGRAPHS IN YOUR WORK FOLDER, YOU MAY NEED TO CONTINUE EDITING THEM NEXT LESSON.

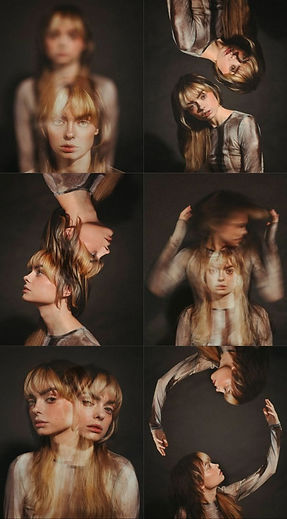
LO: How to Experiment with repetition in Photoshop to create a surreal 'Duplicity' inspired image.


Today you will explore the work of Photographer
Matthieu Bourel
You will do this by:
1. Creating an artist research page with images and annotation about Bourel's Duplicity series.
2. You will then respond to his work by editing your studio portraits.
3. Drag your favourite portrait onto your desktop and drag it onto the PS icon, just like you did last lesson.
4. This time you will be using the Lasso tool to select sections of your portrait.
5. Click on the Lasso tool and draw around the area of your portrait to select it. Then on your keyboard hold the Cmd key then tap c then v. This will copy and paste the selection.
6. This creates a new layer which you can now duplicate the layers and create your duplicity style image.


7. Present any edits you completed in your online sketchbook with annotation about the process of how you achieved your images and which image is the most successful.
REMEMBER TO SAVE YOUR PHOTOGRAPHS IN YOUR WORK FOLDER, YOU MAY NEED TO CONTINUE EDITING THEM NEXT
LESSON.
DIRT: Ensure you have all the work we have done so far in your sketchbook. Use the checklist.

If you finish the DIRT Task.
Get Creative!!!
LO: To create a piece of work that utilises all of the techniques you have used so far.
Using the images you have already taken or new ones if you need to, create an edited image in photoshop that uses selection tools: lasso, polygon lasso, rectangular marquee, plus techniques like repetition,
filters, adjustments and layers and blends.
Success Criteria
You can use more than one image and it should be creative, multi layered (at least 20) and express a narrative.


5. Present any edits you completed in your online sketchbook with annotation about the process of how you achieved your images and which image is the most successful.
REMEMBER TO SAVE YOUR PHOTOGRAPHS IN YOUR WORK FOLDER, YOU MAY NEED TO CONTINUE EDITING THEM NEXT LESSON.
Today you will explore the work of Photographer
Shirin Neshat.
You will do this by:
1. Creating an artist research page with images and annotation.
2. You will then respond to his work by editing your studio portraits and taking new ones if you need them.
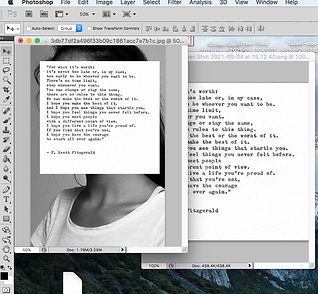
3. Hand write or create a word document of text that links to the ideas you were initially researching. It could be a poem or lyrics to a song, it should be a message you want to include in your final digital collage.
4. Photograph the text or screenshot if you've done a word doc and save it to your desktop. Drag this and your favourite portrait into photoshop and experiment with your layers and blends to achieve an image where the text blends seamlessly into the image.
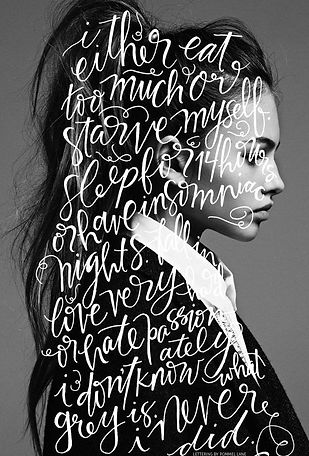
LO: To Experiment using text and imagery to
convey a message.
Today you will explore the work of a student project
NJOA Branding
You will do this by:
1. Creating an artist research page with images and annotation.
2. You will then respond to their work by editing your studio portraits and taking new ones if you need them.
3. Hand write or create a word document of text that links to the ideas you were initially researching. It could be a poem or lyrics to a song, it should be a message you want to include in your final digital collage.
4. Photograph the text or screenshot if you've done a word doc and save it to your desktop. Drag this and your favourite portrait into photoshop and experiment with your layers and blends to achieve an image where the text blends seamlessly into the images.


LO: Experiment using text and
imagery using hand written techniques.
5. Present any edits you completed in your online sketchbook with annotation about the process of how you achieved your images and which image is the most successful.
REMEMBER TO SAVE YOUR PHOTOGRAPHS IN YOUR WORK FOLDER, YOU MAY NEED TO CONTINUE EDITING THEM NEXT LESSON.

5. Present any edits you completed in your online sketchbook with annotation about the process of how you achieved your images and which image is the most successful.

Today you will explore the work of Photographer
Hannah Reynolds
You will do this by:
1. Creating an artist research page with images and annotation as you have before.
2. You will then respond to her work by editing your studio portraits and taking new ones if you need them.
3. Use Dafont to create a message to include in your imagery.
4. Screenshot your text and drag it into photoshop, use the magic wand to select the background and delete it.
5. Drag the text onto you portrait and go to 'image -adjustments - invert' to make it white.
6. Use the warp tool 'edit - transform - warp' to make the text fit perfectly within your portrait.


REMEMBER TO SAVE YOUR PHOTOGRAPHS IN YOUR WORK FOLDER, YOU MAY NEED TO CONTINUE EDITING THEM NEXT LESSON.
LO: To Experiment using text and imagery using Adobe Fonts and Warp in Photoshop
LO: To Experiment using text and imagery using Adobe fonts and incorporating your message.
Today you will explore the work of Photographer
Barbara Kruger
You will do this by:
1. Creating an artist research page with images and annotation as you have before.
2. You will then respond to her work by editing your studio portraits and taking new ones if you need them.
3. Use Dafont to create a message to include in your imagery.
4. Screenshot your text and drag it into photoshop, use the paint bucket to change the colour of the background
5. Repeat this process until you have created your message


6. Present any edits you completed in your online sketchbook with annotation about the process of how you achieved your images and which image is the most successful.
REMEMBER TO SAVE YOUR PHOTOGRAPHS IN YOUR WORK FOLDER, YOU MAY NEED TO CONTINUE EDITING THEM NEXT LESSON.
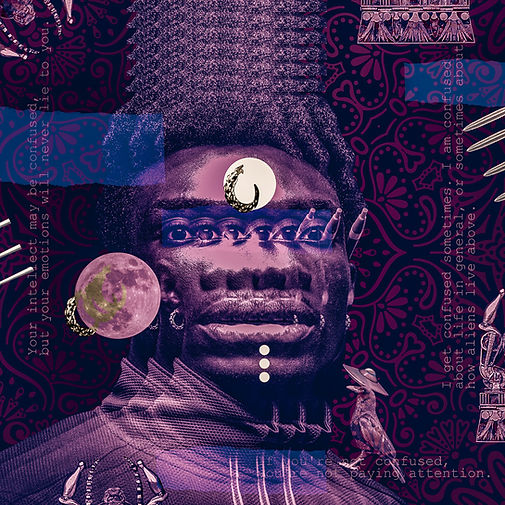
Today you will explore the work of Photographer and artist Kaylan M
You will do this by:
1. Creating an artist research page with images and annotation as you have before.
2. You will then respond to her work by editing your studio portraits and taking new ones if you need them.
3. You will need lots of different images and illustrations to create your work
4. Start with a portrait and use the quick selection tool to select the subject. Drag this onto a new 'International paper' document.
5. Repeat this process with other images until you have built up your digital collage. This should link to your initial ideas and convey a narrative.


LO: To Experiment with colour, pattern and texture to create a digital collage.

6. Present any edits you completed in your online sketchbook with annotation about the process of how you achieved your images and which image is the most successful.
REMEMBER TO SAVE YOUR PHOTOGRAPHS IN YOUR WORK FOLDER, YOU MAY NEED TO CONTINUE EDITING THEM NEXT LESSON.
Time to say something your way and create your final piece!!!
Creating a digital collage with a message.

1. Create a new document that is 60cm wide 20cm high.
2. Using your paint bucket, colour the background black
3. You are going to create an image which combines all of the techniques you have learned so far:
- Selecting and refining your edges using your lasso and quick selection tools, Repetition, adding colour, using brushes, double exposing using your blends palette, adding portraits and your own photographs, adding text in different ways and most importantly expressing a narrative - Saying Something - linking back to your starting point.
4. It must be all your own images, nothing from the internet!
5. You must also experiment with scale in order to create space in your image. This will involve creating a foreground, a middle ground and a background.
6. Create 3 different versions using different imagery.
Using all of the skills you have learned so far, you are going to create your final Digital Collage.
Ensure it contains the following:
Your message, loud and clear.
Text
Multiple images (your own)
Colour and black and white images
A combination of all of the techniques that you have learned so far.